Showing posts with label conservation. Show all posts

Tuesday, 23 December 2014

On the Mend: Part III

An update on the conservation of Woman with a Floral Wreath 

Last post, I described mending the tear, lining the canvas for support. Now finally I can give you an after treatment image.

Before Treatment                                     After Treatment
 To recreate the surface of the original paint where there was lost material, the areas of missing paint were filled with a putty-like material similar to the original ground, and the original surface texture was replicated using very fine tools. The fill was carefully retouched to match the surrounding original paint with a stable resin, which mimics oil paint well, and importantly has good aging properties. The resin remains fully reversible in solvents which don’t affect the original work should anyone wish to remove the retouching in the future. All this information is carefully documented.

(1) Detail of the tear before treatment (2) Detail of the tear after filling with white putty-like material (3) Detail of the tear after treatment.
The tear is in quite a challenging area with lots of flat colour. This can be more challenging than areas with a lot of detail. With a lot of patience and with the help of optivisors the project was finished. I look forward to seeing her on the Gallery wall soon.

– Genevieve Silvester, Paintings Conservation volunteer

Wednesday, 5 November 2014

On the Mend: Part II

An update on the conservation of Woman with a Floral Wreath 

Before treatment began
Last week I described how the painting had been removed from its old stretcher and the excess wax carefully removed. The next steps in the treatment plan are to mend the tear in the canvas before lining the canvas for support and to enable re-stretching before retouching the loss so it is no longer a focal point.

Mending the tear 

The fibres around the tear were broken and in disarray and some were sitting on the wrong side of the canvas covering original paint. To have any hope of getting a flat surface (crucial for achieving a perfect retouching) and recovering the hidden original paint meant hours under the microscope, removing old fill and carefully placing the fibres back into their original positions. These were supported by the addition of a few new threads where threads had been broken or were missing.

1. Under the microscope the mess of matted fibres embedded in the white fill is apparent  2. Looking at the same area with transmitted light, after the fill was removed and the fibres were aligned and new fibres were being added to fill in gaps. 

This highly delicate work can only be achieved under magnification.
Filling and lining 

The old losses were then filled and the painting was lined onto a new lining canvas using a vacuum table and with temperature control. After lining, the painting could be stretched onto a new stretcher.

Lining the painting

1. During lining the painting is under vacuum 2. The painting is stretched and ready for retouching
Varnishing and retouching 

The final stages of the treatment are the varnishing and mimetic retouching which aims to make the new repair invisible to the viewer.

Further research

Before a treatment begins, the painting is subjected to a thorough examination, and throughout the conservation process the conservator naturally gains a pretty intimate knowledge of a painting. Examination under magnification reveals just how the painting was made, identifying pigments, revealing the build-up of paint layers and changes since execution. Occasionally samples of paint can be taken and looking at these under strong magnification can reveal the painting’s composition. Two samples were taken from Woman with a Floral Wreath using a method shared in a previous post.

These samples shed light on how the ground was applied – unusually, in three distinct and separate layers.

A tiny sample of paint from the flesh tones of Woman with a Floral Wreath. The upper layer of paint shows a mixture of red, blue, yellow, black and white pigments used to create an area of flesh in shade. The bulk of the sample is three layers of white ground. 
The information gained from these will hopefully make it possible to make an informed estimate of the origin of the canvas. It is hoped that this research into provenance through technical examination will be continued after the treatment is complete. The discovery of French newsprint on the old stretcher, the ground structure and identification of pigments are all great leads for further research on the provenance of this painting.

Fragments of newsprint on the old stretcher
Please check back later for further exciting developments, and to see the painting after the treatment is complete!

– Genevieve Silvester, Paintings Conservation volunteer

Friday, 31 October 2014

On the Mend

The conservation of Woman with a Floral Wreath from the collection of Auckland Art Gallery Toi o Tāmaki.
 

Before treatment: the discolouration of old overpaint over a large tear in the lower right of the painting is very distracting.
Probably late 18th century, Woman with a Floral Wreath is a copy of the work of Jean-Baptiste Greuze (1725–1805). Scarred by an old tear in the lower right of the canvas – which had become raised and discoloured – our painting has lingered for a number of years in storage awaiting conservation treatment.

First steps

The impetus for treatment centred on that tear. The edges had begun to lift and the retouching was significantly discoloured, no longer integrated with the surrounding original paint. To improve the repair, the old retouching and fill needed to be removed.

But, to complicate matters, the painting was wax-resin lined (a second canvas is adhered to the original) some time ago, but the adhesion had begun to fail. Unfortunately the adhesive was applied unevenly which caused deformations in the original canvas. To remove these, the two needed to be separated and the glue removed. This also allows realignment of the fibres in the tear which would help ensure an almost invisible repair.

Removal of the lining

To protect the surface of the painting, a sheet of strong but flexible tissue paper was adhered to the surface.

Applying facing tissue
The stretcher and lining canvas were then removed. It was exciting to discover newsprint in French still adhered to the stretcher giving further clues to the painting’s provenance. The thick layer of wax resin adhesive was removed as far as possible. After which the painting regained much more flexibility and the deformations relaxed back into plane.

1. Removing the old stretcher  2. The lining canvas, made from cotton duck 3. The original canvas, with a layer of thick uneven wax-resin

Removal of the varnish 

To support the painting during varnish removal and while mending the tear, it was temporarily adhered to a polyester fabric around the perimeter. This was attached to a strainer, allowing safe handling, access to front and back, and air circulation during varnish removal.

The back of the painting made accessible while attached to a temporary strainer during treatment.
A film of discoloured varnish and much of the overpaint was removed, revealing the subtle tonal modelling of the painting.

Halfway through varnish removal, the left side still has a layer of yellowed varnish.

About me

A kiwi paintings conservator, fresh from training and working in Europe, I was looking to gain experience with fellow New Zealand conservators when the chance to be involved in this project arose and I have been preparing this French beauty for a return to the gallery wall.

In my next entry I hope to show the process of repairing the canvas and lining and retouching, and maybe dabble with some technical examination results. Check back soon!

– Genevieve Silvester, Paintings Conservation volunteer

Monday, 7 July 2014

Art Surgeons


In the documentary The Art Surgeon, former Auckland Art Gallery conservator Leslie Lloyd takes us through the process of treating a painting. He looks very much the mad scientist in his white lab coat, with syringe and bottles of coloured chemicals. The patient – the painting – is fully sedated. It has been cut from the stretcher, canvas removed thread by thread, impregnated with wax-resin and lined onto a new support. Next is the cleaning, where everything will be revealed. The point that Lloyd is trying to make – in a rather theatrical fashion – is that his work was more than just fixing stuff. It requires expert knowledge and is highly skilled.


The Auckland City Art Gallery was the first art gallery or museum in the New Zealand to have a conservator and Lloyd was employed by Director, Peter Tomory, as ‘Restorer’ in 1956. The term conservator is more commonly used today, as the work involves both preservation and restoration. Internationally people have been restoring paintings since the 17th century, but the development of a theoretical and scientific basis for conservation is a modern concept, and relatively recent in Lloyd’s time. Before the late 19th century, permanent alterations as well as completions 'in style', were not clearly distinguished from conservation.

We are told in the documentary that Lloyd used both his training at the Victoria & Albert Museum and his experience as a surgeon’s assistant in the Second World War in his role at the gallery. Certainly his treatments appear fairly drastic to conservators today. Cutting and removing supporting layers is at odds with contemporary practice, where every effort is made to retain original material and keep treatments reversible. These days, conservation training is specialised and at tertiary level, and conservators abide by a code of ethics set by professional organisations.


Conservation at the Gallery is still going strong, nearly 60 years later. Now there are five conservation positions (paintings, works on paper and objects) and a part-time conservation assistant. We still use an operating microscope purchased by Lloyd in 1968, seen here in use by Kate Woodgate Jones in 1978. From the very beginning, Lloyd steered conservation in a commercial direction taking on work from external clients, which is virtually unheard of in museum circles internationally. The legacy has been an ongoing challenge as we try and balance income generation with work on the collection. Changing artistic priorities and a realisation that decisions cannot be made in isolation, have had a huge effect on the approach taken by conservators, as well as an expectation that conservators can contribute to original knowledge about the works of art.

In June this year, Conservation Services at the Auckland Art Gallery was renamed the Conservation Research Centre, in recognition of the amount of original research undertaken by the department. Conservation research informs the care and treatment of the artworks, so includes information about materials and techniques, history and approaches. It can be in the form of a general investigation into technique, which is behind the conservation exhibition Modern Paints Aotearoa; or it can be historical and technical research required to carry out a treatment, such as The Mocking of Christ by 17th-century engraver, François Langot; and finally it can be the type of research necessary to prevent damage through preventive conservation, such as the Mayo internship project into the time-based media collections. The conservators will continue to provide services to the public and other museums for the time being, but the change in name indicates how much more important research and treatment on the collection is for the future.


A newspaper clipping from 2001 shows a google-eyed conservator (me) looking out over painting. Things haven’t changed that much since the Art Surgeon, and we are still hiding behind our props, but with any luck the new name, Conservation Research Centre, will stick!

– Principal Conservator, Sarah Hillary

Friday, 6 September 2013

Hello from the Getty Conservation Institute: Jackson Pollock’s Mural

Last week I met Yvonne Szafran, head of paintings conservation at the Getty Museum. She told me a little about the joint Getty Museum and Getty Conservation Institute (GCI) project to treat the iconic Jackson Pollock painting Mural from Iowa State University. The painting was commissioned by Peggy Guggenheim in 1943 and is widely recognised as having a crucial influence on the development of the abstract expressionist movement.

Image credit: Tom Learner and Alan Phenix examining Jackson Pollock's Mural. Photo: © J. Paul Getty Trust. Art: University of Iowa Museum of Art, Gift of Peggy Guggenheim, 1959.6. Reproduced with permission from The University of Iowa.
Mural is absolutely stunning in the flesh with its dynamic layering of colour and the environment it creates due to the huge size (approximately 2438 x 6096mm). The painting is in good condition, but in the past it was varnished, which is at odds with Pollock’s technique, dust had settled on the surface making it dirty, another canvas had been adhered to the back (called ‘lining’), and it had been stretched onto a new stretcher (or supporting frame). The new stretcher is almost square but the painting is not, so unpainted edges are now visible having quite an effect on its appearance.

The GCI are using this opportunity to find out more about Pollock’s painting technique and to provide vital information to inform the treatment process. Several of the scientists have been involved, including Tom Learner and Alan Phenix, who you have heard about in my earlier blogs.

Currently the painting is located in a large table in the paintings conservation studio. It has already undergone several forms of analysis and been cleaned by conservators Laura Rivers and Lauren Bradley. The next step is to see if it can be safely restretched onto a new, sturdier stretcher that is better suited to support the great weight of the painting.

You can find out more information about this project on the Getty blog or see photographs and a video on the Wall Street Journal.

- Sarah Hillary, Principal Conservator

Friday, 30 August 2013

Hello from the Getty Conservation Institute – Paint layers

A tiny sample of paint embedded in resin can be made into a cross-section. They allow us to see the layering structure of the painting down to a microscopic level and we can analyse the individual layers as a consequence.

A cross-section from the painting Cross 1959 by Colin McCahon
 I have been making cross-sections for many years but wanted to improve my technique and Getty Conservation Institute (GCI) Scientist, Alan Phenix, agreed to show me the finer details of his method. Alan’s work at the GCI focuses on paint analysis, primarily to assist Getty Museum painting conservators with the paintings in their care.

Sampling from paintings is only done if absolutely necessary and great care is taken in finding a suitable location. The cross-section sample will be smaller than a pin-head and from an existing damage. Alan looks through the microscope to place the edge of the cross-section on a glass slide where it is secured. A plastic mould is placed around it, resin poured in and label inserted to the side.

GCI Scientist, Alan Phenix, pouring resin into the mould to prepare a cross-section.
The resin is placed in a chamber and cured by exposure from ultra-violet (UV) radiation for 25 minutes. UV setting resins are also commonly used by dentists today. Now the cross-section is ready for sanding and polishing followed by microscopic examination and digital photography.

Alan looking at the McCahon cross-section 
In the past the process of making a cross-section would have taken several days, where today we can get much better results in a couple of hours. Alan helped me to improve the surface of a cross-section from the McCahon painting Cross 1959 and he took a photo. Pity about the air bubble in the resin next to the sample, but I won’t make that mistake again!

The Getty will be publishing their cross-section technique online in the near future and more information about Alan can be found here:
http://www.getty.edu/conservation/publications_resources/newsletters/22_3/gcinews9.html

- Sarah Hillary, Principal Conservator

Monday, 26 August 2013

Hello from the Getty Conservation Institute – What paint is this?

When we talk about modern paints, we are referring to those based on synthetic media that were developed during the 20th century. For example, the binder in oil paints is made from natural vegetable oils, often linseed oil derived from flaxseed, whereas an acrylic paint is made from synthetic polymers manufactured from petrochemicals.

We generally rely on the artist’s description and close examination to get some idea of what paint it is. But the artist may not remember what paint they used, visual appearance can be inconclusive, and even if we did know what product they had used, the manufacturer is unlikely to reveal everything about it because of commercial sensitivities. So for an accurate assessment, it is necessary to do chemical or spectral analysis.

GCI Assistant Scientist, Herant Khanjian, with the FTIR microscope. The results from the analysis are on the computer screens behind 

While I have been at the Getty, we have been completing the analysis of some samples taken from paintings in the Modern Paints Aotearoa exhibition. The first we looked at were some tiny black scrapings that were taken from Stalagmites – Stalactites, 1964 by Theo Schoon. They are so small that you cannot see where they came from on the painting with the naked eye.

Image credit: Theo Schoon, Stalagmites - Stalactites 1964, oil on board, Auckland Art Gallery Toi o Tāmaki, purchased 1989 

GCI Assistant Scientist, Herant Khanjian placed a piece of the sample on a tiny ‘diamond window’ (a hard transparent platform) where it was flattened with a very small metal roller. The sample was then placed under the objective of the FTIR (Fourier transform infrared spectroscopy) microscope.

 The image of the sample on the diamond platform is projected on the front of the microscope 

FTIR uses the infrared radiation to analyse and produce information in the form of a spectrum (or chart) that is characteristic of the sample components. In the spectrum are bands which represent chemical bonding between two particular atoms or group of atoms in a molecule. The information is compared with spectra of other known material for identification. The results were a little confusing so we also did a solvent extraction. This means that a solvent was dropped on the sample to draw out the organic components which were analysed. The results were a lot clearer this time, and it appears that the paint is oil and alkyd.

You can find out more about Herant Khanjian here: http://www.getty.edu/conservation/publications_resources/newsletters/13_2/gcinews10.html

- Sarah Hillary, Principal Conservator

Wednesday, 21 August 2013

Hello from the Getty Conservation Institute – Lacquer Projects

On Monday I had lunch with two of the visiting scientists who have been contributing to the Getty Conservation Institute study into ancient lacquer finishes, Julie Chang and Ulrike Kerber. I managed to show my ignorance about this topic very quickly by asking about the use of shellac! I soon learnt that lacquer is nothing to do with shellac. Shellac is a resin secreted by an insect, but lacquer is based on sap collected from trees of the Anacardiaceae family.

The sap is very difficult to collect, and all of the processes of manufacture, which require great skill, are incredibly time-consuming. Julie had found a Chinese document from the 1st century BC which complained about the waste of resources in this process, because a lacquer cup would take 100 men to make and a lacquer screen, 10,000. The sap dries to a layer which is so tough that it can outlast the wooden structure that it is applied to. Many different processes were used to produce the traditional lacquers, but even with the subtle variation in end-product, it is still possible to spot a modern forgery.

Julie Chang with a lacquer cross-section on the screen
More information can be found on their website and the Getty is running workshops on the characterization of Asian lacquers.

- Sarah Hillary, Principal Conservator

Monday, 19 August 2013

Hello from the Getty Conservation Institute – Our Project

Kia ora from the Getty Conservation Institute in Los Angeles, where I am working for the next three weeks. Conservation Scientist Tom Learner, and I will be preparing material for the exhibition Modern Paints Aotearoa, which is scheduled to open at Auckland Art Gallery in April next year.

Auckland Art Gallery Principal Conservator Sarah Hillary and Conservation Scientist Tom Learner in the Getty Conservation Institute analytical lab.
The exhibition will examine the relationship between artistic innovation and painting materials in New Zealand art history, from the late 1950s until the early 1970s.

An understanding of materials is not necessary for appreciation of a painting, but it can provide a valuable insight into the artistic process because the choice of materials has a huge effect on what artists can produce. Big changes occurred in the New Zealand art in the 1960s at the same time as a range of new painting materials became available.

Acrylic paint samples in the GCI lab. 
The Getty Conservation Institute have been carrying out a study of modern paints for many years so that conservators will be better informed about how to preserve them. They have collaborated with conservators from many different countries during this time and the New Zealand project has involved staff from Auckland Art Gallery and Te Papa.

My next few blogs will look at the processes that we have to go through when identifying (or characterising) the paint medium and some of the other work going on here at the GCI.

- Sarah Hillary, Principal Conservator

Wednesday, 17 July 2013

The Mocking of Christ, a conservation project

Before treatment picture of the print in its frame
A tiny thumbnail image in one of Webb’s catalogues alerted Curator Mary Kisler and Conservator Ute Larsen to what became a momentous acquisition by Auckland Art Gallery in 2010. The examination work and the assessment of the condition of this outstanding print was undertaken by paper conservators Ute Larsen and Camilla Baskcomb in 2012. It is thanks to the generous support of the Auckland Decorative and Fine Arts Society (www.dfasnz.org.nz), that a grant was allocated for the conservation project of this work.

The Mocking of Christ is an impressive printed work on paper measuring over 2 metres tall and 1.5 metres wide. It was copied by François Langot, a 17th century French engraver from a now lost painting by Sir Anthony van Dyck. Langot specialized in making large scale prints that were used as altarpieces by churches too poor to acquire important paintings of their own. The engraving is made up of nine separate plates printed on individual sheets of paper joined together to make up one image.

The original oil painting by van Dyck of the Mocking of Christ which Langot copied belonged to Sanssouci, Potsdam (Germany). A record published in 1833 states that the painting had originally belonged to the King of Prussia and measured more or less the same size as our print. A drawing after another version by van Dyck is held in The Louvre (France). It is very similar to our print, but Christ’s hair is being pulled to the right of the image by one of the torturers whereas in our print Christ looks serenely away from the mocking figure offering him a bulrush as a sceptre.

This engraving is special for several reasons: its rarity, its size, the fact that van Dyck’s oil painting is believed to have been destroyed in World War II and that there are very few prints made by Langot as he died relatively young.

The only other known examples of this engraving are held in the collections of the Bibliothequè Royale in Brussels (Belgium), the Museums of the Vatican, and in the Irbit State Fine Arts Museum (Russia). Research has revealed that the impression at the Bibliothequè Royale is in perfect condition because the nine sheets are loose and have never been joined. Our print however, was assembled and pasted down onto a canvas backing, probably in the 18th century.


The folio of unassembled engravings held at the Bibliothequè Royale, Brussels
The old canvas is composed of three pieces sewn together horizontally. Canvas strips have been added at a later date along the edges to help consolidate the old canvas and attach it to a wooden strainer. Although the frame is not contemporary with the work, it is part of its history and we intend to reuse it to display the print, once the treatment of the work is completed.


The back of the print, on its strainer. You can see the stitching lines and the consolidation patch that hold the three pieces of canvas together, along with the more recent paler strips around the edges.

CONDITION OF THE PRINT

The print has suffered significant damages through the centuries, notably an earthquake and associated flood, and so came to us in a particularly poor condition. Several areas were cause for concern on close examination:
  • Disfiguring dark brown water stains resulting from the flooding
  • Black and pink mould stains due to dampness
  • Numerous areas of paper loss and cracks
  • A very thick layer of embedded dust, accretions (wax, insect droppings, paint splashes etc) and insect damages, such as borer holes 
  • An area of black over-paint on the knees of Christ
  • Extensive fold lines and creases.
These details of the print show water stains, cracks, losses and black over-paint on Christ’s knees in the left image. The right image shows the original misalignment of the joined sheets.

This raking light picture allows us to see the extent of the creases and fold lines.

TREATMENT PROPOSAL

First, the print needed to be removed from the stretcher and then from the canvas lining, so that we were able to treat the paper. Vacuuming and dry-cleaning was necessary to remove dust and accretions from both the back and front. As it was extremely difficult to work on the print in its large format, we decided to separate it into the nine printed sheets and treat them individually: they all need aqueous treatment, consolidation of weak areas and repair with antique papers where the original paper and image is lost. We intend to rejoin the nine sheets, after lining them with a new conservation support and retouch the repaired areas. However, our initial treatment proposal was not followed completely as we first thought, as some aspects of the treatment were not entirely predictable, and we discovered new problems that pushed us to find an alternative solution.

In the next episode, you will find out about the tests that have been undertaken on the print and the beginning of the treatment. Stay tuned!

- Ute Larsen and Camilla Baskcomb, Works on Paper Conservators 

Tuesday, 9 October 2012

Conserving the Cornwall Park Map

Camilla Baskcomb, paper conservator, and Laura Mirebeau, paper conservation intern, are glad to open the doors of their conservation studio in order to present this project.

In early June, a large 1901 hand-drawn map of the proposed design for Cornwall Park came into our paper conservation lab, which was initially stored at the Auckland Museum by the 
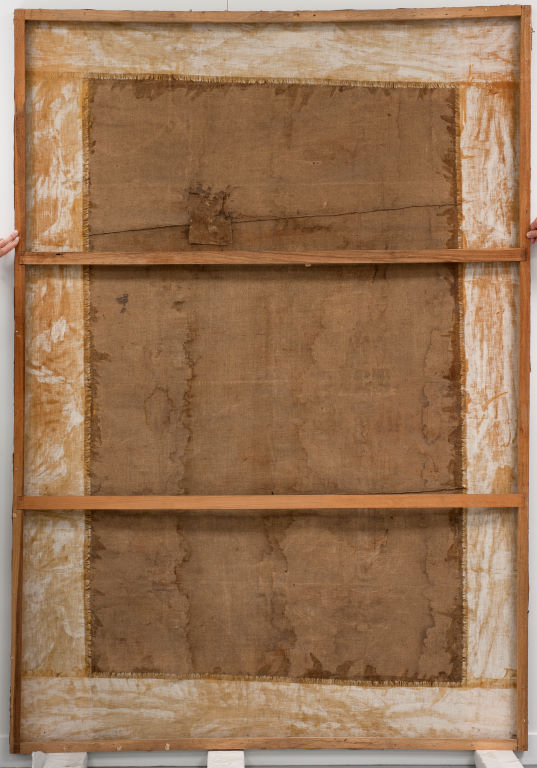
Logan Campell Residual Estate. This map, composed of six sheets of wove paper lined on canvas, measures 260 x 303 cm, and is nailed along both the top and bottom edges on wooden battens, which allow it to be rolled and unrolled. You will easily guess that the unusual size of this document is quite problematic for its conservation.

The map is painted with watercolour, and one can see the graphite preparatory drawing and squaring up by looking closely. It is particularly interesting and moving to realize that the original design differs from the park as we can enjoy it today, as one can see two lakes on the map that were never built.

Before treatment

Condition


The map was kept in storage rolled up and thus suffered from severe distortions and horizontal undulations.

The bottom edge was particularly damaged along the batten, creating several areas of losses, caused by pests (one can see rodent teeth marks when looking closely) and by the storage conditions. Two creases were weakening the top edge of the map along the batten. The surface was embedded with dust and grime throughout, but mostly in the bottom part, and along the edges. The paper had darkened and discoloured over time, with brown foxing spots visible, water stains, splash marks, footmarks, dark brown stains (probably of a corrosive nature), and rust stains. These damages are mainly due to atmospheric pollutants, a previous water damage, and generally bad handling of the plan.

Before treatment close-ups of the areas of losses, ingrained dirt and teeth marks

Examination


Raking light examination showed us the extent of the distortions. Extensive photographic work has been undertaken by Gallery photographer John McIver.

We also discovered watermarks during the examination phase, along the left edge of each sheet of paper, which identified the papermaker. “James Whatman Turkey Mill Kent 1900” reads the watermark, giving us the manufacturer, the location and the date the paper was made. Whatman invented wove paper, soon very esteemed by architects, engineers, and surveyors who were looking for a uniform surface for their detailed drawings.1

After measuring each sheet, we came to the conclusion that it was actually Antiquarian wove paper, the largest hand-made paper ever made in Europe, which “became famous for its use in the production of maps, prints and watercolours”2. That paper was almost universally used by 1873, according to that same book, and could take up to a year to properly dry before being sold. As the map had been drawn in 1901 in New Zealand, and considering the length of the shipping trip, it is highly likely that that batch of paper was still in its drying process on the boat to NZ.

Raking light photograph of the watermark

Treatment


Considering the size and the nature of the map (media and construction), it was decided that we would not carry out any aqueous treatment to de-acidify the paper or reduce the foxing spots and other stains.

Because of the width of the map, we put two benches end to end so we could roll and unroll the map as we progressed with the treatments.

Dust and superficial grime have been removed very efficiently. The crumpled tears have been flattened in order to be able to mend it. All the tears and loss areas have been repaired and consolidated using an antique Whatman paper, and a calico lining (cotton textile) on the back. These areas have then been retouched with watercolour in an archival manner.

Dusting with a conservation vacuum cleaner


Before and after dry cleaning

Conservation powder eraser before and after use

Before and after vacuuming

Mending

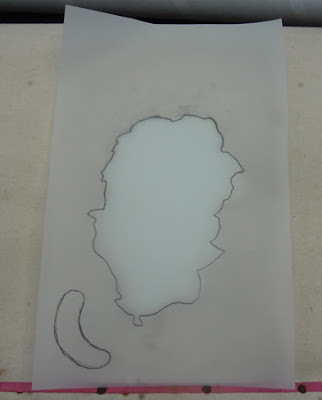
Tracing of the losses


Antique paper piece made after the tracing of the loss

Sticking down the loose canvas and reattaching the pink ribbon

Heat spatula applied to reattach the new canvas patches
 

Retouching with watercolour

Before and after retouching


The map is now ready to return to the Auckland Museum for storage and display.


1. T. Fairbanks Harris, M. Fuller, M. Green, Papermaking and the Whatmans, in Papermaking and the Art of Watercolors in Eighteenth-Century Britain, T. Fairbanks Harris ans S. Wilcox, Yale University Press, 2006, p. 83. 
2. Op. Cit., p. 106.

Thursday, 5 April 2012

Conservation Bite! Part 3

Paintings conservator Ingrid Ford continues our series on the treatment of On the Sea-Beat Shore by William Calderon. View the first two installments here.

So onto the treatment!

Once the painting was laid out, we needed to come up with a plan on what steps we could achieve in the time the work was in the lab.

Our first step had to be to clean and consolidate the cracked and damaged paint. Constant rolling and unrolling of the work to access the back and the front meant added stress to the paint layer that we hoped to avoid.  By consolidating the damaged paint we could safely turn the painting back over to work on the repair of the tears, but that will come later!

After a number of tests to sections of the painting, we were able to determine which cleaning solution was the most effective.  Although the areas of damaged paint certainly needed to be stabilised, we had to clean the dirt off first otherwise we would be adhering dirt to the surface! 

After settling on a suitable cleaning solution, the surface dirt of general dust and grime from decades of age and storage came off easily. By rolling the damp cotton swabs over the surface we were able to remove the dirt without disturbing the fragile paint around the damaged areas.


Nel and Ingrid cleaning the paint surface

Although the swab came of dark and dirty, the overall image didn’t change much, highlighting to us just how discoloured the varnish truly was beneath the layer of surface dirt.
 
Dirt from cleaning the surface layer

As previously mentioned, many of the losses were a result of creases to the support, whereas some involved more significant and deeper losses.

Deep paint loss exposing canvas

 Paint losses caused by creases

Our next step required the consolidation of the damaged paint around the losses.  Using Isinglass, (a conservation grade fish glue) the fragile paint was carefully re-adhered to the support with a fine brush soaking the adhesive between the lifting paint and the canvas support. 

Sarah and Nel consolidating the damaged areas of paint

Having successfully cleaned and consolidated the paint layer, we were ready to turn the painting back over and tackle the repairing of the tears, but that is for the next instalment.